

Sometimes your internet feels oddly sluggish: messaging apps send and receive just fine, but websites refuse to load or take forever. This often points to a DNS server hiccup – the service that translates website names into IP addresses – rather than your router or browser. Fortunately, switching DNS servers in Windows 11 or 10 takes just a few minutes, no extra software or network reinstall needed.
DNS servers convert human-friendly URLs into machine-readable IP addresses. If your DNS server is slow, overloaded, or tampering with results, Windows might throw errors like ERR_NAME_NOT_RESOLVED or just hang waiting for a reply. Changing your DNS helps fix that bottleneck. But note, it won’t bypass IP blocks or deep packet inspection imposed by ISPs or governments.
Best DNS servers to use in Russia in 2026
Choosing a DNS server in Russia today is about more than speed – it’s also how well the service works with your local ISP. There’s no one-size-fits-all answer, but the core public resolvers remain steady.
- Yandex DNS: 77.88.8.8 and 77.88.8.1
- Yandex Secure DNS: 77.88.8.88 and 77.88.8.2
- Yandex Family DNS: 77.88.8.7 and 77.88.8.3
- Quad9: 9.9.9.9 and 149.112.112.112
- Google DNS: 8.8.8.8 and 8.8.4.4
- Cloudflare: 1.1.1.1 and 1.0.0.1
- AdGuard DNS: 94.140.14.14 and 94.140.15.15
For most Russian users, Yandex DNS remains the go-to option thanks to low latency on local networks and reliable uptime. Quad9 is a solid backup that also blocks malicious domains. Google DNS is widely compatible, although some ISPs replace its unencrypted responses. Cloudflare often performs well globally but can be unpredictable in Russia, especially when using encrypted DNS.
How to change DNS via Windows Settings
This is the easiest method for both Windows 11 and Windows 10 (version 1903 and later). No reboot is needed; changes apply instantly.
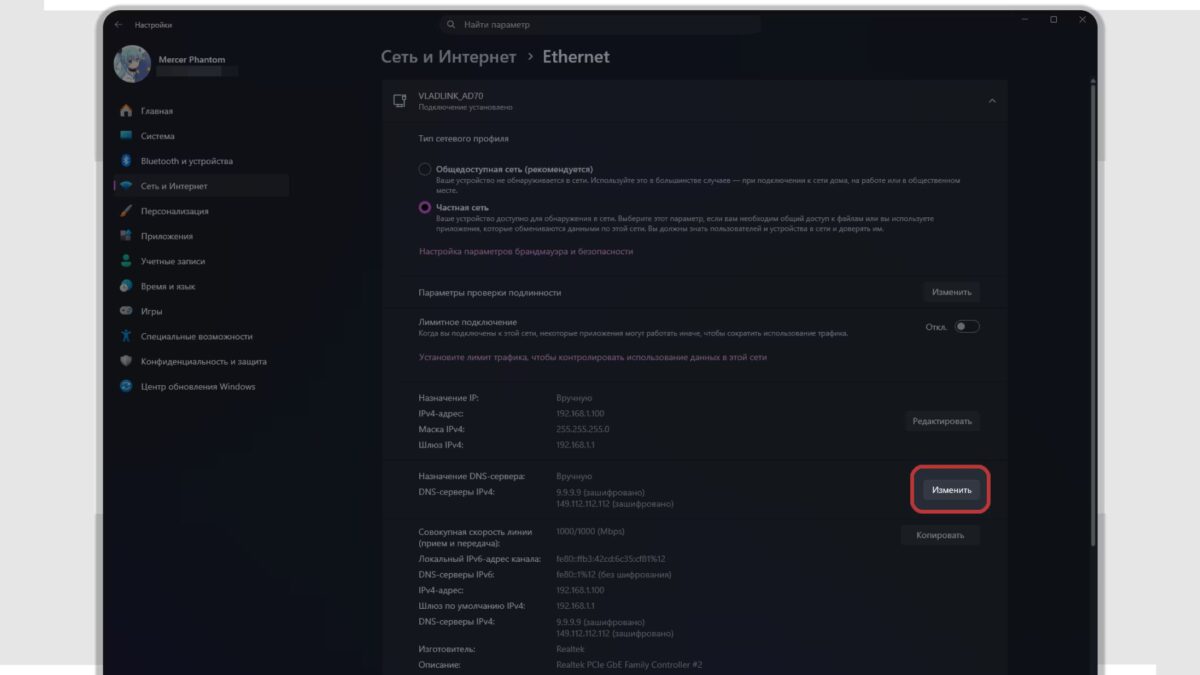
- Press Win + I to open Settings, then go to Network & Internet.
- Select your active connection (Wi-Fi or Ethernet).
- Go to the connection’s Properties.
- Find ”DNS server assignment” and click ”Edit.”
- Switch from ”Automatic (DHCP)” to ”Manual.”
- Turn on IPv4.
- Enter your preferred DNS addresses, for example 77.88.8.8 and 77.88.8.1.
- Save the changes.
If your ISP also provides IPv6, repeat these steps for IPv6 addresses. Otherwise, some DNS requests may still go through the old server, making the switch seem ineffective – a common source of confusion.

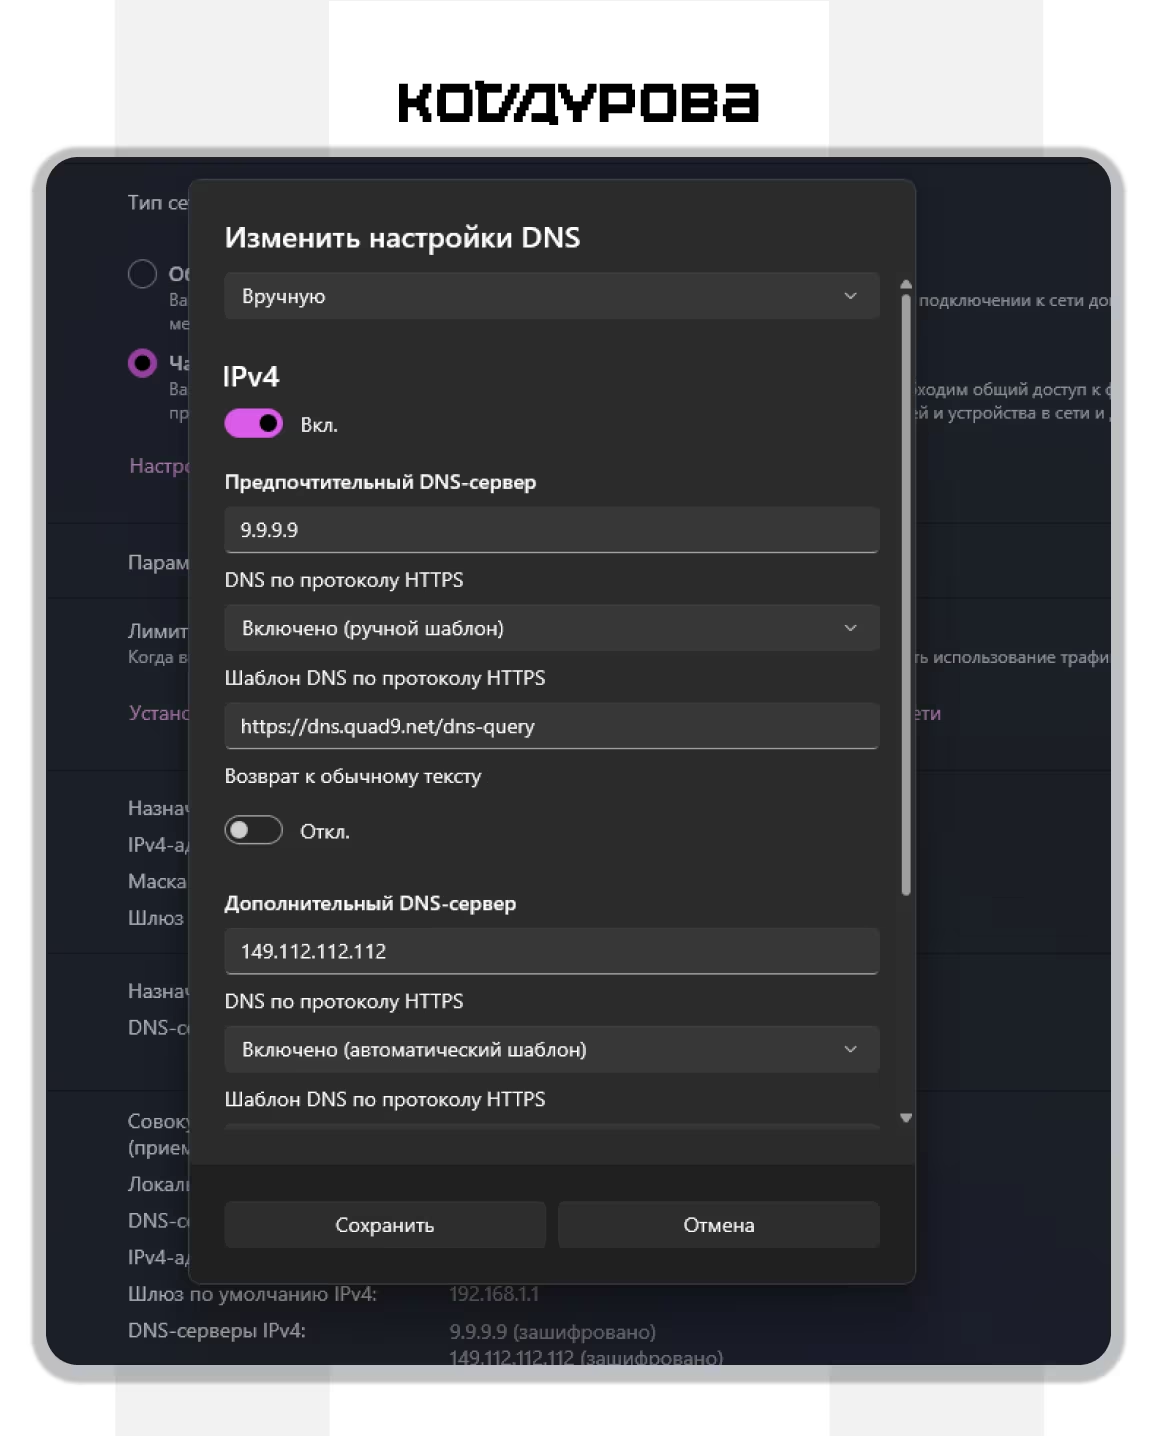
Image source: kod.ru
Change DNS via Control Panel
This method works on older Windows 10 builds, as well as Windows 8.1 and 7. The interface hasn’t changed in years, which makes it easy to use.
- Press Win + R.
- Type
ncpa.cpland hit Enter. - Right-click your active network connection.
- Choose ”Properties.”
- Select ”Internet Protocol Version 4 (TCP/IPv4).”
- Click ”Properties.”
- Check ”Use the following DNS server addresses.”
- Enter your DNS addresses and click ”OK.”
For example, use Quad9’s 9.9.9.9 and 149.112.112.112 or Yandex’s 77.88.8.8 and 77.88.8.1. Changes take effect as soon as you close the dialog.
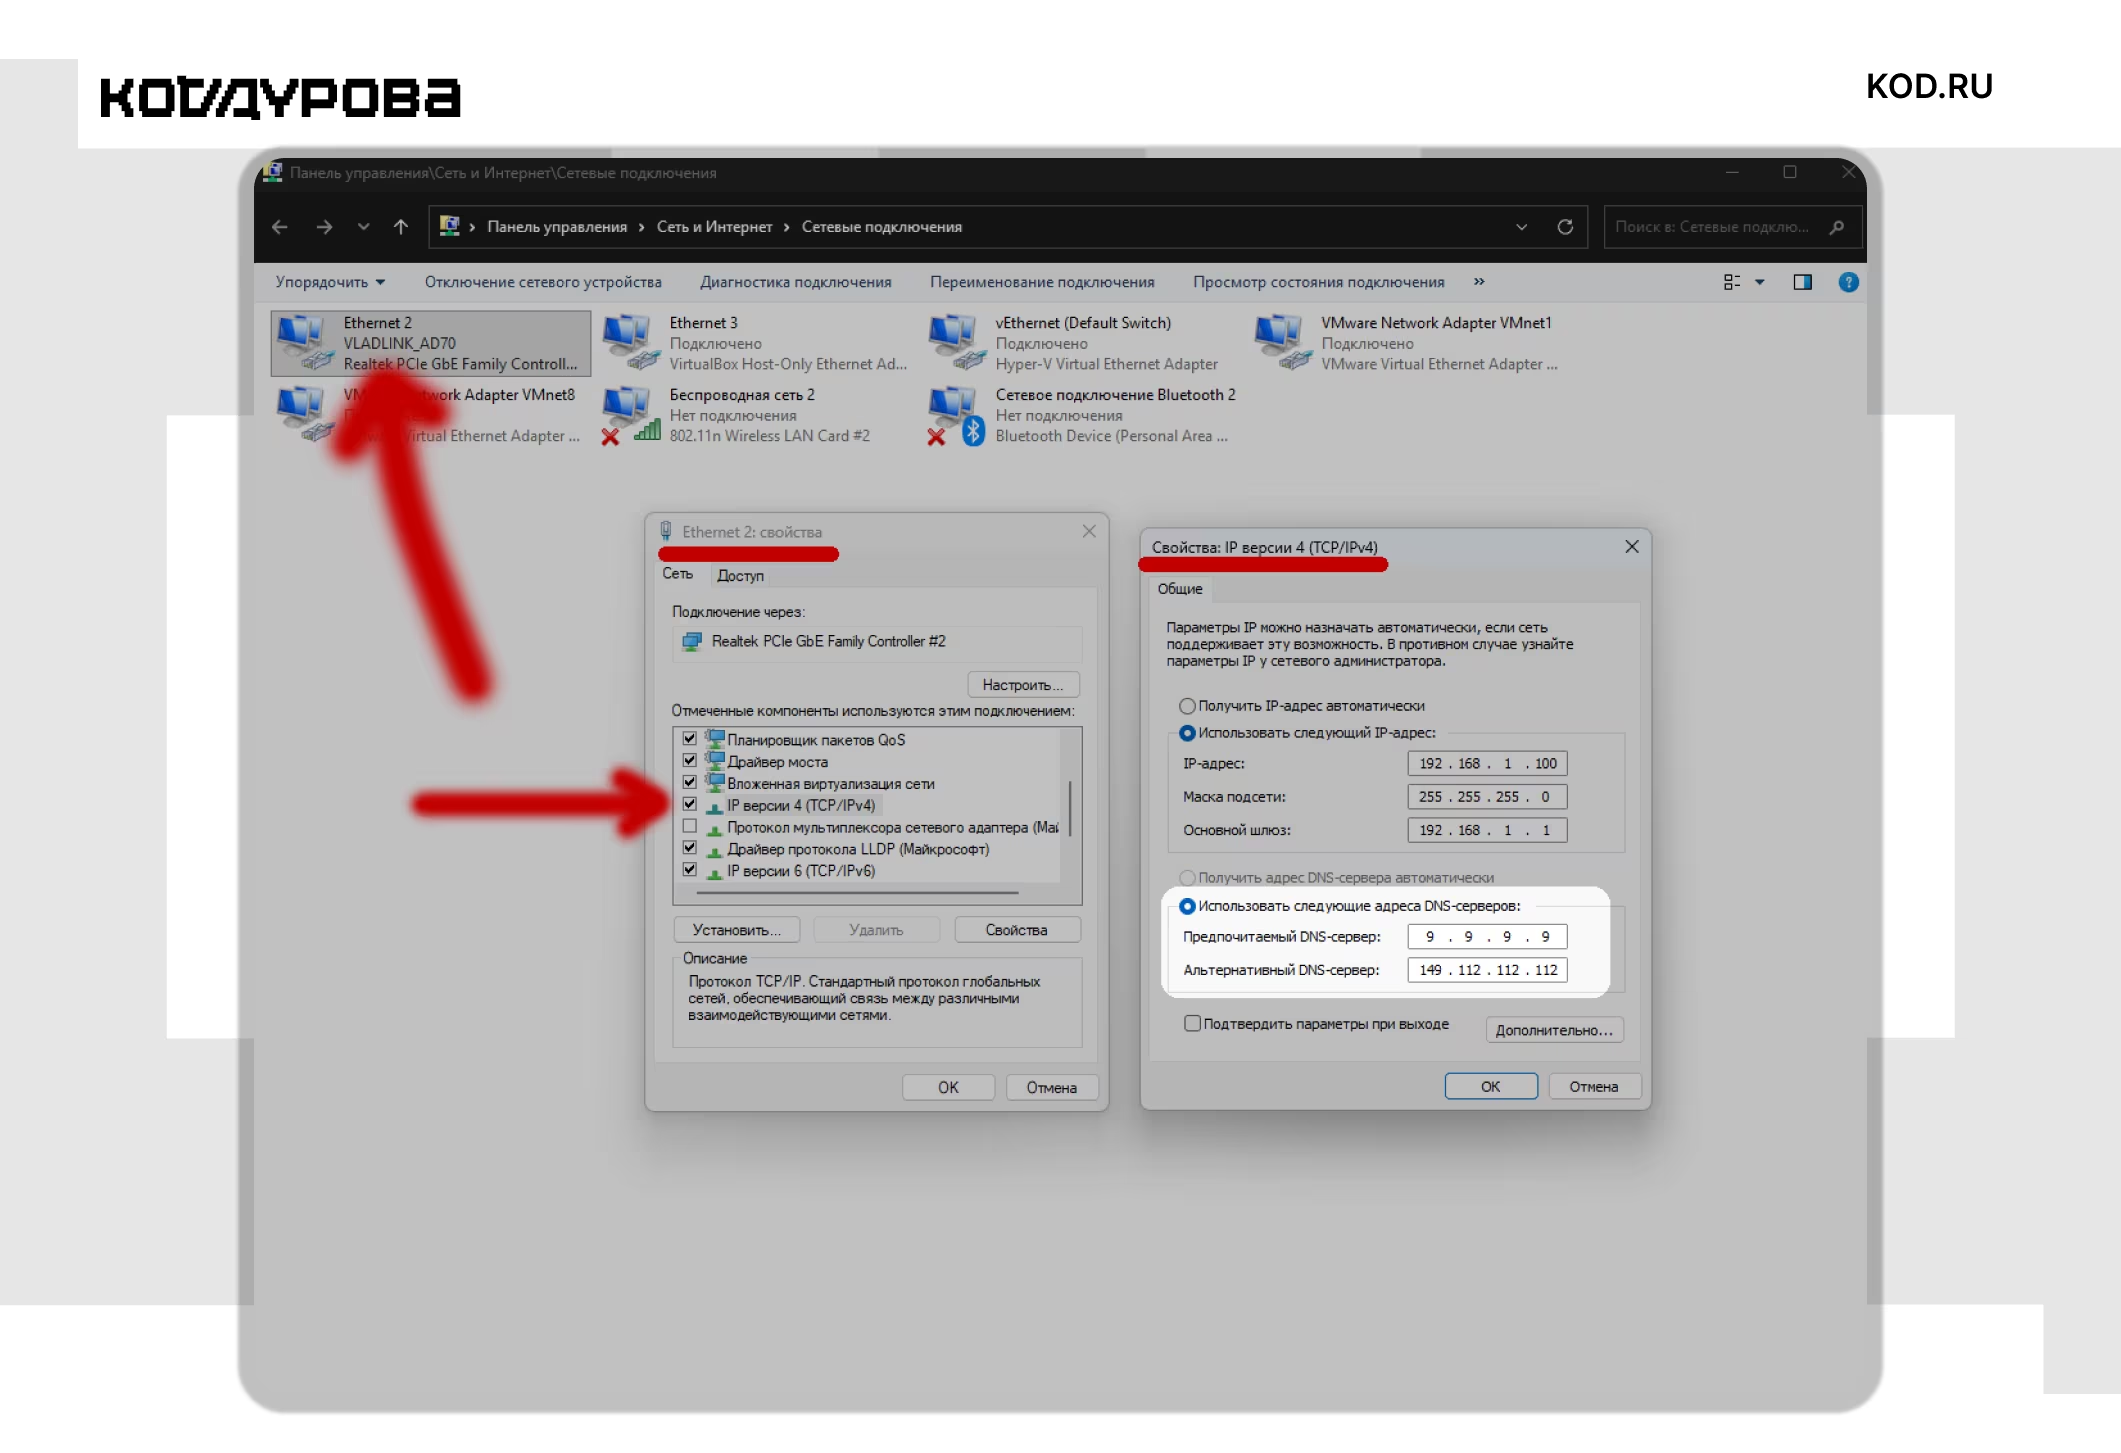
Image source: kod.ru
Change DNS with PowerShell
PowerShell offers a faster way to configure multiple adapters, revert changes quickly, or automate DNS tweaks. Run it as Administrator.
First, list your network interfaces:
Get-DnsClientServerAddress
Then set DNS for the desired interface (replace ”Ethernet” with your interface name):
Set-DnsClientServerAddress -InterfaceAlias "Ethernet" -ServerAddresses ("77.88.8.8","77.88.8.1")
To revert to automatic DNS assignment:
Set-DnsClientServerAddress -InterfaceAlias "Ethernet" -ResetServerAddresses
DNS encryption options in Windows 11
When manually setting DNS in Windows 11, you can choose DNS over HTTPS (DoH) modes. Windows offers three options: unencrypted, strictly encrypted, or encrypted with fallback to unencrypted.
The ”Encrypted only” mode is risky – if the chosen server doesn’t support DoH, DNS resolution stops altogether. This is a real issue in Russia, where some providers and sites struggle with encrypted DNS channels.
The practical choice is ”Encrypted preferred, unencrypted allowed,” where Windows uses DoH when possible but falls back gracefully. Windows knows DoH settings for Cloudflare, Google, and Quad9 out of the box. Windows 10 doesn’t have this interface, so you’ll need to enable DoH within your browser instead.
What to do after changing DNS
- Flush your DNS cache with
ipconfig /flushdns. - Fully restart your browser.
- Verify your DNS settings with
ipconfig /all. - Try visiting sites that had trouble loading before.
If sites completely fail to load after switching, switch back to automatic DNS. In Settings, revert to DHCP; in IPv4 properties, enable automatic DNS assignment.
Change DNS on your router and common pitfalls
To apply new DNS settings to all devices on your home network, it’s easier to change them at the router level. Log into your router’s web interface via addresses like 192.168.0.1 or 192.168.1.1, find the Internet, WAN, or DNS section, disable automatic DNS from your ISP, and enter your preferred servers manually.
- Public DNS servers won’t resolve local device names (like your NAS or printer).
- If you use a VPN, system DNS is often ignored.
- Browsers like Chrome, Edge, and Firefox may use their own DoH regardless of system DNS.
- Changing DNS does not anonymize your connection.
If your network includes local services accessible by name (NAS, printers, Pi-hole), changing DNS on just one PC is safer. Changing it on the router can break local name resolution. But if you don’t use local network names, this is usually not a concern.
For Russian users in 2026, the recommended approach is: set Yandex DNS first, flush your DNS cache with ipconfig /flushdns, and test problematic sites without VPN or browser DoH enabled. If issues persist, the problem probably lies beyond DNS – in routing, IP blocking, or the service itself.